Lightroom Export Settings & Presets – A Simple Overview
Lightroom export settings are a bit overwhelming at first, and setting them may feel like it takes too much time. Fortunately, for most family photos, you only need to know a few things, and if you are using Lightroom, you only have to set it up once. Then, you can save it as an export preset, which makes the whole process super quick. This is a quick article to walk you through the setup and use of presets.
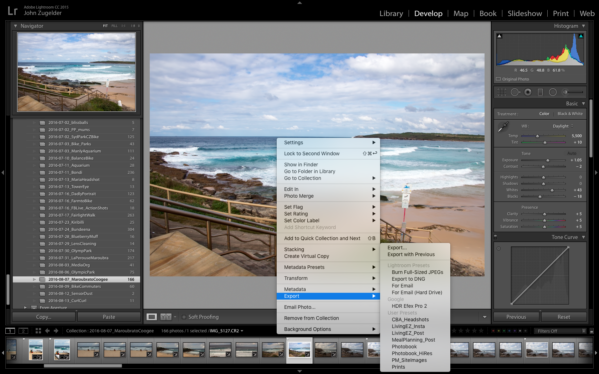
When viewing an image in Lightroom, the easiest way to export is to right-click, and select “Export” from the menu that appears. If you hold down shift, you can select multiple images, and then export them all at once. As you can see, there are a few options to choose.
- Export – Brings up export menu
- Export with Previous – repeats the previous export
- Presets – This will quick export using your presets, and if your preset includes a specific location, the file will land there.
Once you click export, you will see the following:
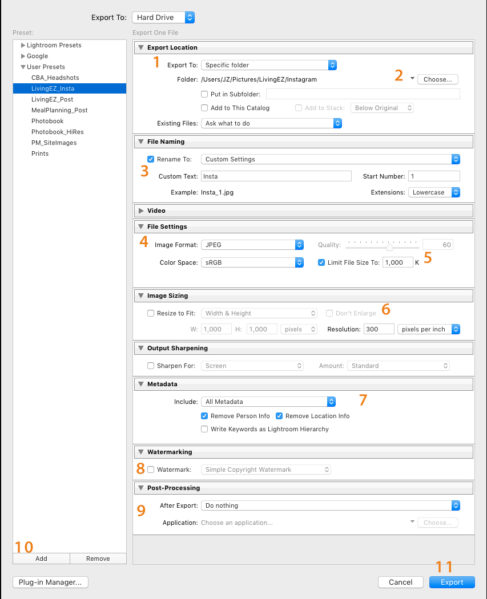
Everything You Need to Know – Lightroom Export Settings & Presets
- This where you select the export location options. We use a specific folder – read more about our folder structure here.
- Clicking “Choose” pops up the dialogue box to select a folder on your hard drive. You can also click the “Put in Subfolder” checkbox. Typically, we check the box, and then enter a relevant subfolder name to group photos for our weekly Instagram or Blog Post schedule.
- This is where you set the file name, and start number. If you selected multiple images, Lightroom will automatically number them for you.
- We choose JPEG for the image format because we primarily export for web use, and they offer higher quality web viewing.
- We select the checkbox to limit file size to 1,000K. We like to share higher quality images, and we figure most people have fast enough internet that this should take only a second to download. Depending on your preference you can lower it. We use 500K for images on Positive Mornings to prioritize the page load time. The next section has the dimensions greyed out because we are limiting to file size.
- Image sizing will affect file size and print quality. We tend to leave the image dimension alone. You are better off setting the dimensions when you crop the photo during editing to make sure the final image is not distorted. For example, if you export a standard 3×4 photo as an 8×10 without cropping first, the image will look squished because it is has cram the pixels into a rectangle with different dimensions. As for resolution, we select 300 for these photos because that is optimal for printing, and then we don’t need to export them a second time, unless we want very large prints. Again, for Positive Mornings, we prioritize page load times, and this is set to 72. The resolution does not matter unless you plan to print the image.
- The importance of this sections depends on whether or not you have GPS built into your camera, as well as whether or not you have peoples names saved to leverage Lightroom’s facial recognition features. We check the boxes to remove person and location information. Some people also use this if they do not want to publish the camera settings.
- If you designed a watermark in Lightroom, this will overlay it on the images you export it.
- Post processing options will launch additional applications, like photoshop, or even open the folder where you export the image.
- The “Add” button pops up a dialogue box, for naming and saving the current export settings as a preset for future use.
- Finally, the export button completes the process.
We love optimizing our workflow, and the presets, make such difference. We also like the ease of resizing the images within the export tool. Let us know if you have any questions or additional tips and tricks.
One last note, we share some of our best tips and up to date camera news in our bimonthly newsletter. Make sure you sign up for our photo tips newsletter to gain access to our library of subscriber-only photo tutorials!